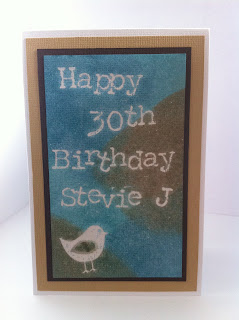
Yesterday was my husband's 30th birthday.
I wanted to share this birthday card I made for him.
For the base and the top layer, I used White SB Essentials (4925). The thin brown matt is made from Coffee SB Essentials (4920), and the larger brown matt, from Brown Sugar (1055).
I stamped my greeting using the Old Typewriter Letters Stamp Set (172LN), and the Little Birdie (4413KC), and then clear embossed (as it takes some time to stamp out a longer greeting letter by letter, I shook my embossing powder on after stamping each letter, then heat set all together once I had finished stamping).
To colour the top layer, I used the Direct to Paper technique with Broken China, Faded Jeans and Vintage Photo Distress Inks. You could use different colours for a different effect (or even a feminine card). This technique would also work well with the new Distress Stains, Kaszazz have coming out soon, or for a slightly more muted look, use a Foam Pad with an Ink Blending Tool!
The embossed image and letters resist the ink, but you still need to wipe the ink off the embossed parts before your card is done.
To help my colours blend a little better, I spritzed it with some water from a Mini Mister, then dried it off with my heat gun (for a feminine card, add some Perfect Pearls to the water to create some shimmer).
On the inside, I created a little envelope, just big enough to hold a gift card.
Wednesday, November 23, 2011
Tuesday, November 8, 2011
Craft Room Update
My good friend Vanessa gave me me a lovely shelving unit for my craft room, so of course, I had to re-arrange my craft room to fit it in!
I know some of you who follow my blog like seeing my workspace, so here are some photos of the newly arranged craft room! Although the new unit is big, it takes up less space then the bike I never used (except to store things on!), and holds so much that I actually have more space now than I did before! I'm loving the new layout of my room, and will love it even more when I can easily remember where I've moved things to!
I know some of you who follow my blog like seeing my workspace, so here are some photos of the newly arranged craft room! Although the new unit is big, it takes up less space then the bike I never used (except to store things on!), and holds so much that I actually have more space now than I did before! I'm loving the new layout of my room, and will love it even more when I can easily remember where I've moved things to!
 |
| My crafting desk |
 |
| To the left of my desk: return with a few tools close to hand |
 |
| My new storage unit, with colour coded ribbons and other bits! |
 |
| My crafting desk, with lamps from Ikea |
 |
| My DVD holder turned storage! This sits right in front of me, and makes it easy to see what I've got. And, it's all within reach! |
 |
| To the right of my crafting desk is my 'working' desk! |
Subscribe to:
Posts (Atom)
